Planting Native Trees and Shrubs
go.ncsu.edu/readext?822294
en Español / em Português
El inglés es el idioma de control de esta página. En la medida en que haya algún conflicto entre la traducción al inglés y la traducción, el inglés prevalece.
Al hacer clic en el enlace de traducción se activa un servicio de traducción gratuito para convertir la página al español. Al igual que con cualquier traducción por Internet, la conversión no es sensible al contexto y puede que no traduzca el texto en su significado original. NC State Extension no garantiza la exactitud del texto traducido. Por favor, tenga en cuenta que algunas aplicaciones y/o servicios pueden no funcionar como se espera cuando se traducen.
Português
Inglês é o idioma de controle desta página. Na medida que haja algum conflito entre o texto original em Inglês e a tradução, o Inglês prevalece.
Ao clicar no link de tradução, um serviço gratuito de tradução será ativado para converter a página para o Português. Como em qualquer tradução pela internet, a conversão não é sensivel ao contexto e pode não ocorrer a tradução para o significado orginal. O serviço de Extensão da Carolina do Norte (NC State Extension) não garante a exatidão do texto traduzido. Por favor, observe que algumas funções ou serviços podem não funcionar como esperado após a tradução.
English
English is the controlling language of this page. To the extent there is any conflict between the English text and the translation, English controls.
Clicking on the translation link activates a free translation service to convert the page to Spanish. As with any Internet translation, the conversion is not context-sensitive and may not translate the text to its original meaning. NC State Extension does not guarantee the accuracy of the translated text. Please note that some applications and/or services may not function as expected when translated.
Collapse ▲Late fall is an excellent time to plant trees and shrubs in the south. Cooler fall days are a pleasant time for us to work outdoors, plus a fall planting gives roots time to establish, giving you a better performing plant next summer than one planted in the spring. More frequent gentle rains also mean you will not have to spend as much time and labor watering new plants. Woody plants provide a multitude of functions in your landscape, so take some time to think about what purpose you might want your new tree or shrub to serve before planting. Trees and shrubs help modify climate by providing shade or by diverting wind, they can promote visual appeal by acting as a natural screen and blocking unsightly areas, provide air filtration, and also help prevent erosion and runoff.

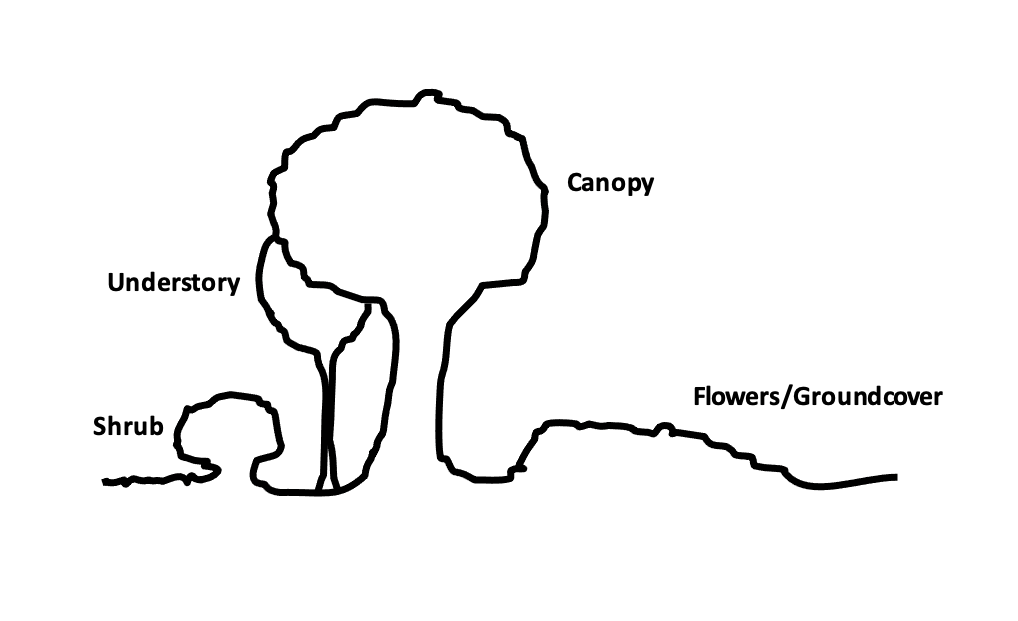
Figure 1. Creating vertical layers in the landscape is important for sustaining diversity and maximizing food and habitat availability for other native organisms.
Native trees and shrubs offer additional advantages compared to non-native species and should be added into landscapes when possible. Native plants have evolved closely with native organisms over thousands of years in a given area and many native organisms feed on a narrow range of plant species, especially insects. As natural areas become developed, habitat for native organisms and plants is lost or diminished. Native plants are commonly replaced by non-native trees, shrubs and flowers that do not necessarily sustain the organisms that traditionally occur in that landscape. As homeowners you can help replace native plants in the landscape and help keep the balance of pests and beneficial organisms in check.
Choosing the right plant and site
Selecting the “right plant for the right place” is the most important consideration when adding something new to your landscape. Woody plants can be very long-lived if chosen, planted, and maintained correctly, so think carefully before purchasing. Evaluate the space above ground, root space available below ground, the duration and intensity of sunlight, and characteristics of shade in the area. Carefully consider proximity to structures, lowest temperature points in the yard, strong winds, and microclimates. In addition to choosing the right site, best practices for choosing natives include choosing a diversity of species that supply a range of food and shelter for organisms.
Think in layers of height, more vertical layers of plants will provide habitat for more species! From tallest to shortest, “vertical layers” refers to canopy trees, understory trees, shrubs, and finally, flowers and ground cover (Figure 1). Canopy trees, oaks in particular, can support hundreds of species. These trees are foraging hubs and a very important source of food for caterpillar species (which rarely threaten tree health). Chickadees are caterpillar specialists and a single nest can require 6,000-10,000 caterpillars to rear juvenile birds which require protein for proper development.
Common Natives
A few commonly planted and commercially available native canopy trees include: River Birch, Red Maple, Black Gum, Southern Magnolia, Pin Oak, and White Oak. Next, we go to the understory trees and shrubs. These are prime nesting sites for birds and offer a range of food for organisms by providing flowers, fruits, and berries. A few common native understory trees are: Redbud, Dogwood, Serviceberry, and Sweet Bay Magnolia. Beneath your understory layer, you can include smaller shrubs. Common shrubs to look for are Fothergilla, Inkberry, and Coral Honeysuckle. Lastly, you can fill in the final “vertical layer” of your planting with perennial flowers and groundcover. Plant flowers and groundcover in groups and swaths of three to four feet for pollinators. Just a few native perennials to consider are: Green and Gold, Eastern Columbine, Bluestar, Baptisia, Joe Pye Weed, Goldenrod, Asters, various milkweed species, and Switchgrass. The goal is to have at least three types of flowers in bloom each season from early spring to late fall.
Site preparation
You will probably want to get straight to planting once you decide what to purchase, but preparing your site will help save time, money and frustration in the long run. If you have not had your soil tested in the last two to three years, consider having a soil test done to evaluate the pH and the nutrients your site might need to help your new plant thrive. You can find soil testing supplies at any North Carolina Cooperative Extension office. This is free from April to Thanksgiving and $4 per sample from the rest of the year. You will also want to evaluate some of the physical characteristics of your soil. Is it heavy with clay? Is it sandy? You can do a quick evaluation of your soil drainage by digging a 12-inch hole where you plan to put your new plant and filling the hole with water. If water does not drain and remains in the hole for 24 hours you will want to choose a plant that can tolerate wet conditions. You can change the structure, drainage, and overall health of the soil by adding in compost over time, but you will still want to carefully consider the conditions of what you are starting out with.

Figure 2. Diagram of a properly planted tree. Notice the flare of the trunk sitting slightly above the grade of the soil. The hole is deep enough for the root ball and two to three times wider.
Preparation
Woody ornamentals come in a variety of containers. The most common types of trees and shrubs from nurseries are container-grown plants, bare-root plants, and balled-and-burlapped (B&B) plants. The specific type you buy will determine the best practices for planting, but the practices described hereafter can help establish all three. First, move your plant to the new location, remove any wrapping around the trunk, twine from the crown, along with any non-biodegradable packaging and wrapping. If there is more than one central leader on the tree, chose the healthiest one and prune off any others. Measure your root ball using a yardstick, measuring tape, or approximate using your shovel handle. The ideal hole for planting should be dug deep as the root ball and two to three times wider (Figure 2).
Planting
Slick sides of the hole can act as a barrier for roots and water. Rough up the sides of the hole with your shovel to create area for roots to easily grow horizontally, but make sure the bottom of your hole is firmed up to reduce risk of your plant settling in too deep over time. Position your plant in the hole so that it is straight and take a few steps back to make sure it is oriented the way you would like to see it. The flare of the trunk should be slightly above grade of the soil. For B&B plants remove the wine from the base of the trunk and remove the first third to half of the wire surrounding the root ball with wire cutters then pull the burlap down and cut off the top of the burlap as well. For container plants, shave the roots around the bottom of the ball and loosen any compacted soil using a shovel.
Fill in the planting
Finally, start to refill your hole with soil and water in your plant well when the hole is filled half way. Surround your plant with soil so it is level with the ground around your plant and carefully break up any large chunks around the plant to minimize large air pockets. Take care not to compact the soil too tightly since this will make it harder for growing roots to penetrate beyond the planting hole and also cause drainage issues. Add several inches of compost around the root zone of newly planted trees and shrubs and construct a small basin several inches high just outside the trunk to help direct water to the root zone of your new plant. Water in your plant again and apply about two inches of organic mulch over the area that extends beyond the canopy of your new plant.

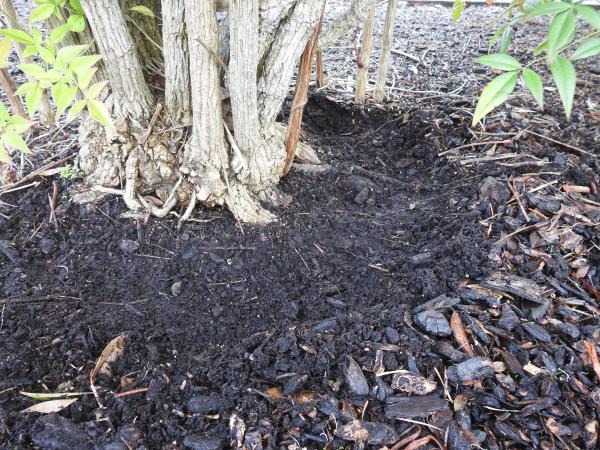
Figure 3. Mulch is applied six inches from the trunk of the tree to assist with air circulation and decrease incidence of pests and diseases.
Be sure not mound the mulch up directly on the trunk and leave about a six-inch space between the trunk and the mulch to assist with air circulation and minimize insect damage, or disease (Figure 3). Mulching as a final step will help with maintaining moisture, discourage weeds, and also help reduce fluctuations in soil temperature. In subsequent years, work one to three inches of compost into the soil surface around the root zone to improve soil structure, add nutrients, attract earthworms, and promote beneficial fungi. For trees and shrubs that are already established you can maintain soil heath by adding more compost annually. Start two feet from the trunk, cultivate the soil shallowly to about one foot beyond the drip line and rake one to two inches of compost into the top two inches of soil.
Learn more about this topic from the Native Plants or Woody Ornamentals chapter of the North Carolina Extension Master Gardener Handbook, the North Carolina Extension Gardener Plant Toolbox, or Landscaping for Wildlife with Native Plants.


